Saturday, July 30, 2011

Auctions: Full of Great Deals

Yes we are doing Auctions, We need to make room. LOts of good deals will be going up during the weekend.  We started using GothAuctions again. It is a free Auction site with a lot of great folks :)

Handmade Bath Set: Silky Milk Bath, Willow's Tea Bath, Dragons Blood Bath Salts, Victorian Rose Soap
Click here to go to the Auction Listing

Pentagram Chest with Charcoal, Pentagram Tile, 4 spell mixed and White Sage.
Click here to visit the listing. 


Pentagram Round Chest with Black Dragons blood Votive Candle, Healing Spell Mix, Wooden Pentagram Tile,  And Charcoal 
Click here for the Pentagram Chest Auction.


Hecate Triple Pentagram Treasure Chest with: Willow's Tea, Spa Soap Peppermint, Rain Sea Salts 
Click here for the Hecate Treasure Box Auction

Celtic Pentagram Mango Wood Chest with Wooden Pentagram Tile, White Dragons Blood Votive Candle, Purification Spell Mix, 1 roll of Charcoal 10 diskettes in a roll.
Click here For the Celtic Pentagram Auction.


Celtic Cross Box with 3 lady Choice teas: Vitamin C, Awaken Vitality, and Prosperity Tea, 1 Wire mesh tea ball.
Click here for the Celtic Cross Box Auction.

We will be adding Tons more all Weekend, To visit our list of Auctions click here. By selling these off we will be able to make room for the bigger projects we would love to do. Enjoy!

Friday, July 29, 2011

Weekly Special: Pentagram and Tree Incense Chest

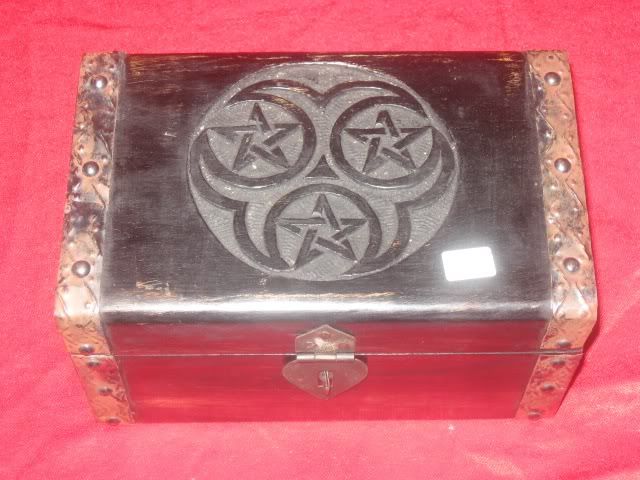
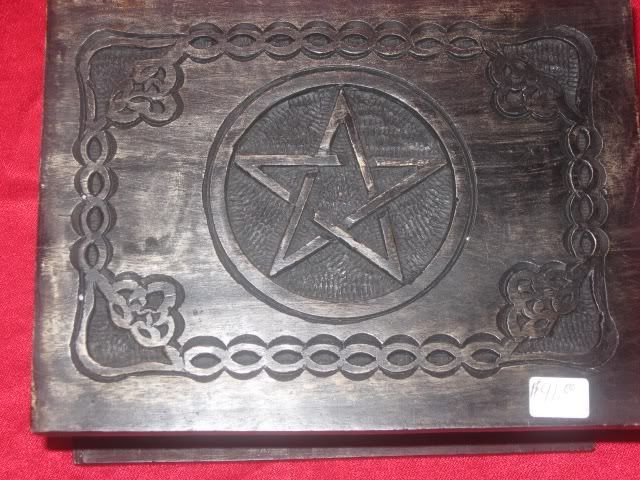
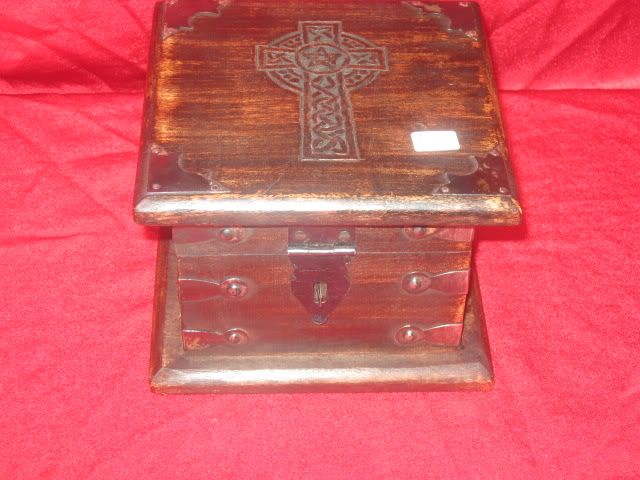
This beautiful Hand carved incense box needs a home.

This tall, narrow chest is an absolute delight. With a top lid that seals tightly when it closes, it also helps to keep the scent of your incense from permeating the room in which it sits unless you want it to. On its front and two sides, you will find skillful carvings, depicting interwoven pentagrams on the upper portion, while on the front you will also find a clever caving of the Tree of Life, framed by Celtic knots and resting atop a base of three more interwoven pentagrams. Each of the side facings provides a delicate image of interwoven Celtic knots in place of this design. With a rear facing that is blank, the lid also sports an interwoven pentacle design and as well as decorative metal accents. Standing 11 1/4" tall, 6" deep and 6" wide, it opens only at the top to offer one tall storage compartment that is perfect for storing your incense or taper candles. Skillfully carved of wood, it would be perfectly at home upon the altar or anywhere else in the house that you would choose to store it.


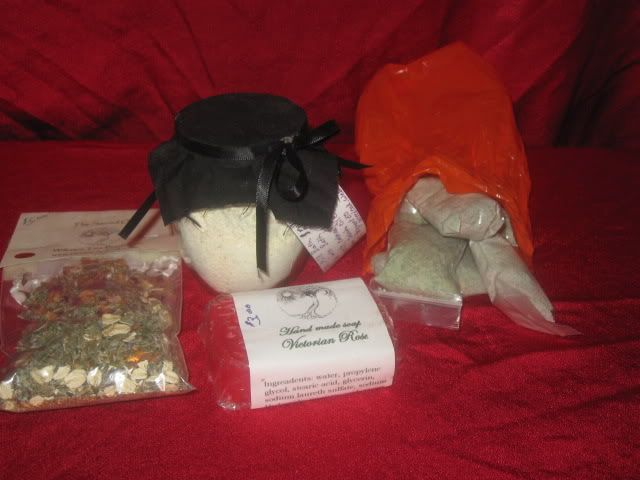
*Extras that have been added into the box: A Curved Incense Ash Collector, Nag Champa Incense, Japanise Rose wood Incense and Your Choice of 5 Incense!
Incense choices: Myrrh, Honeysuckle, Earth Goddess, Lotus, Pumpkin Spice Tea, Violet, Vetivert, Shadow and Light, Egyption Musk, Bayberry, Ambergris, Anise, Citronella, Ceaderwood, Dragon's Blood, Clove Bud, Altar

Price $57.00 S&H flat rate: $10.95 USA, $26.55 Canada and Mexico, $43.23 to all other countries. You may purchase this item through our website e-mail us for an Invoice.

Challenge Friday

Willow Completely Forgot to make a challenge today, She has been busy with life issues.
She hopes to get back into the grove of them over the weekend. So Enjoy our past Challenges and we can't wait to see yours!

Have a blessed Weekend!

Friday, July 22, 2011

Challenge: Lammas Incense

We know we promised two challenges this week, but again willow became very busy. But she did get one done!

A little back story on Lughnasadh:
Lughnasadh or Lammas is celebrated on August eve or August 1st and is the first of the harvest festivals. Lammas is the Anglo-Saxon name, meaning Loaf mass and Lughnasadh is the festival of Lugh, a Celtic God of Light and Fire.

Lughnasadh is a time of the fullness of Life, a celebration of the bountiful earth. It is also a time of the sacrificial mating of Goddess and God, where the Corn King, given life by the Goddess and tasting of Her love is sacrificed and transformed into bread and ale which nourishes us. Lammas is a day of thanksgiving to the Goddess for Her bountiful harvest and is the perfect time to state your hopes for what you wish to harvest and is a time of transformation and the sharing of the energy of the Corn King. Spells of prosperity, abundance and fertility are also wonderful to perform on this sacred day.

This is Willow's mix using the herbs and oils associated with this holiday. She added Dragons Blood Oil to give it a powerful charge.

What you need:
Mortar and pedestal
Frankincense
Rose Petals
Rosemary
Sandalwood
Dragons blood oil
Jar to stor it in.

Use equal parts Willow uses a tablespoon. On the oil she does 6 drops.
Place 1 tablespoon of each herb and 6 drops of the oil into the mortar and pedestal. Grind together this can take some time and muscle on the frankincense, to ease your issues use sandlewood powder.
Frankincense

Frankincense

Rosemary 

Sandalwood Powder

Sandalwood Powder

Rose Pelts Red these were from Willow's Birthday Roses

Rose Pelts Red these were from Willow's Birthday Roses

Dragons Blood Oil

Dragons Blood Oil

You can also purchase the finished incense from our shop as well as most of the ingredients to make your own. Have fun and enjoy this mix :)

Wednesday, July 20, 2011

Keepsakes For the Grandparents

Well willow decided she needed to make the Kids Grandmas something special. She Decided to fill two tiny mason jars with the kids birth colors. She went with swarovski crystals as they were not as expensive as the kids actual stones. Each one cost her close to $10.00 to make in materials alone. A nice investment for something the grandmas will treasure.


Close up on the words
 The Heart Says: May the love of these stones fill your Heat, and know your Grandchildren Love you for always. Then the Birth colors for each child as well as there astrological sign and colors.


Close up on the bottle, She used Epoxy to seal the bottles and quark. 


Closeup on the bottle with the 3 color layers.


Sharpie pen for size reference.

Close up on the bottle with her thumb for size reference.
If Willow was to make these for people they would have to be listed as Custom Orders and would cost about $16.00 before shipping. These were fun to do up and so simple anyone can do them. We hope you liked our little share :)

Friday, July 15, 2011

Challenge:None this week

Willow was so busy with custom orders this past week that she forgot to prepare one. So next Friday Look for two Posts in One!

We do hope all have a wonderful weekend.

Friday, July 8, 2011

Challenge: Corn Husk Dolls

Loghnassadh The first Harvest Sabbath is coming up on August 1st so we thought we do something once a week to get folks prepared. If your wanting recipes you should cheek out TheCUPWA blog every 2 days they will be doing traditional recipes. We decided to cover the decorations as part of our challenges.
The First one we decided to cover are Corn Husk dolls, these are really fun to do with the kids. We found our instructions at Family Fun. The link will take you to the Witch Doll version the below instructions is the simple dolls.

Here is the run down of Supplies and directions with our own pictures.

Materials
• Dried corn husks or tamale wrappers (available at grocery stores)
• Twine or string
• Scissors
• Pipe cleaners


  1. Soak the dried corn husks (approximately 20 per doll) in warm water for about 10 minutes to soften them, then blot them dry. Next, gather twenty 10-inch lengths of twine and tie an overhand knot at one end.
  2. Trim the husks so that they are each about 8 inches long. Then sandwich the knotted twine between 4 or so husks and tightly tie another piece of twine around the bundle just above the overhand knot.
  3. Make the doll's arms by rolling up a pipe cleaner in a husk (this will make the arms posable). Roll up 2 more husks (without pipe cleaners). Then braid the three together and tie the ends with twine.
  4. Take the bundle from Step 2 and peel down the husks (as you would a banana) to create a head and expose the hair. Tightly tie the bundle where the neck should be, then insert the arms.
  5. Braid together 3 rolled husks (without a pipe cleaner) for each leg. Then use 2 of the inner husk ends to tie the tops of the legs to the dolls. Trim the remaining husk ends an inch below where the legs are attached.
  6. Snugly wrap a single husk around the doll's hips, tying the ends together to secure it. Trim the knot tails.
  7. Now it's time to dress the doll. If making a girl, go right to Step 8. For a boy, create leggings by wrapping a single husk around each leg and tightly tying twine around the very top. Then fringe the leggings by making a series of short snips along the outer sides.
  8. For a skirt, sandwich the doll's body from the hips up with a few husks and secure them to the waist with twine. Then peel down the husks. For a girl doll, leave the skirt long; for a boy, trim 1 1/2 inches from the waist. Finally, drape husks over the shoulders. Crisscross the ends in front and in back of the doll and sash them around the waist with twine.
Corn Husk Witch Doll
Materials
• 24 pieces of black yarn, each about 15 inches long
• 8 tamale wrappers or dried corn husks (sold in grocery stores) soaked in water for at least 5 minutes
• 3 (12-inch) tan pipe cleaners
• Scissors
• 1 (6-inch-long) stick


  1. Gather the pieces of yarn and knot them together at one end. Shake off excess water from the soaked wrappers or husks, then stack 4 of them together and lay the yarn on top with the knot near the narrow end (A). Roll the layered husks around the yarn and cinch them just above the knot with half a pipe cleaner (B).
  2. Fold the husks down over the knot to make the witch's head (A). Wrap another pipe cleaner half around the husks at the neck (B).
  3. For posable arms, roll up a long piece of pipe cleaner in one of the husks (A). Wrap a short piece of pipe cleaner around each end at the wrists, then sandwich the arm piece between the layers of folded-down husks, tearing the husks to separate if needed. Secure the arms in place by wrapping another pipe cleaner half just below the arms to form the witch's waist (B).
  4. To make the hat, cut two 5-inch-diameter circles, each from a husk. Cut one circle in half and curl one half into a cone. To keep the shape, poke a small piece of pipe cleaner through the husk layers at the wide end of the cone and twist the ends together (A). Cut a 1 1/2-inch asterisk in the center of the other circle (B) and carefully push the cone three quarters of the way through the hole (C).
  5. For a broom, fringe the wide end of a husk (A). Cut the husk K inch above the fringe, then roll the strip around the end of the stick. Secure it with a small piece of pipe cleaner (B).
We hope you enjoyed our little how to and we would just love to see yours! Feel free to share with us :)


    Thursday, July 7, 2011

    Earth Robe

    I have just started a few days ago on an Earth Robe design. Unfortunately I only had enough brown to do a child size as my example. So I shrank down the pattern sewn it up. Unfortunately I still made it way to big for our model.


    I then went to Urban Threads and got  there Earth Elemental Hand embroidery design. I printed it out to fit the paper as is, traced it onto the back of the robe after having to enlarge the design to fit. Instead of Hand stitching I went with paints and painted it up.


    I then found an earth chant and translated it into Elven Writing I had the font in my font directory in my comp. It is JRR Tolkens Elvish Script.


    I then made my boarder using a bright green thread. I then took my gel pen and began writing the letters into the boarder. This took a few hours. Now I then took my Green Ivy fabric paint and traced the letters. I did this in sections and took about 2 days.
    The Elven Boarder Painted

    Earth Element with 1/2 inch grid

    Enlarged Earth Element with 1 inch grid


    Phase 1 of painting the Earth Design.

    The original Toggles did not have holes so I had to leather punch some so we could sew it right onto the robe.

    Close up.

    Back view of the robe.

    Close up we decided not to paint the trunk, the earth pieces are copper acrylic.

    Front.

    Close up on the toggle clasp on the front.


    I then Heat set the back image and then put it in the wash on its lonesome. Allowed to hang dry then Ironed it again.

    And I then added a leather simple loop and toggle closure.

    Well thats it, Keep your eyes peeled for a listing on the website very soon.